
Hacking My Chevy Volt to Auto-Switch Driving Modes for Efficiency
Let’s talk about my car. I have a Chevy volt which is a Plugin-in Hybrid Electric Vehicle (PHEV). On electric alone, it gets about 50 miles of range in ideal conditions and then it has a gas tank to take you the rest of the way on long trips (about 350 miles from gas). The car also has a handful of modes (as do most cars). I won’t bother going into them all here since I just want to focus on two: “normal mode” and “hold mode”. In normal mode, the car uses the electric range first and then switches to gas. In hold mode, it switches the car to the gas engine and “holds” the battery where it is. This allows you to save your remaining electric range for later which is useful on long trips since the electric motor is more efficient below 50 MPH.
So what’s the problem? When I take long trips that exceed the electric range of my car, I want to use the electric range as efficiently as possible. To do that, I try to end the trip with 0 miles of electric range and use the electric engine anytime I’m traveling under 50 MPH and the gas engine for over 50 MPH. This is easy enough to do by hand, but it also seems like an extremely easy thing for the car to do automatically. Chevy could have added another mode called “trip mode” that would do exactly that, but they didn’t, and that’s frustrating. Also, after owning the car for almost 5 years, I find I’m much more forgetful on long trips when it comes to switching engine modes, and I’ll regularly end up on the highway burning through my electric range without noticing.
Designing “Trip Mode”
So, in this blog post, I’m going to be designing and implementing “trip mode” for my Chevy Volt. The final code, setup, and usage instructions will be available in the GitHub repository for this blog post. First, let’s talk about what we need the mode to do at a minimum:
- When the car starts, something needs to prompt: “Are you taking a long trip?”.
- In trip mode, when traveling under 50 MPH, the car should be in normal mode.
- When traveling over 50 MPH, the car should be in hold mode.
- There should be a delay or cooldown to prevent mode switching too frequently.
- The speed threshold should be configurable.
I have a Raspberry Pi laying around along with a compatible 7 inch touchscreen, so that will work great as an interface to prompt for enabling “trip mode”. To talk to and control the car, I will use a Gray Panda from Comma AI. Comma AI doesn’t sell the gray panda anymore but any of the Panda colors will work fine. For this project the $99 white panda would be enough. There are probably other OBD-II devices that could be used (I’m honestly not sure).
Hardware List
Here is the complete hardware list:
- Raspberry Pi 4B 4GB or equivalent.
- Any Panda should work.
- A male-to-male USB type-A cable to connect the Pi to the Panda (just Google and pick one).
- A touchscreen for the raspberry Pi to turn trip mode on and off (I also have the case for the touchscreen).
- Some way to mount it somewhere in your car if you want.
I didn’t have a male-to-male USB type-A cable laying around, but a USB type-A to type-C cable will work if you have a male type-C to male type-A adapter like I do:

Once I had the hardware, I connected it up like this:
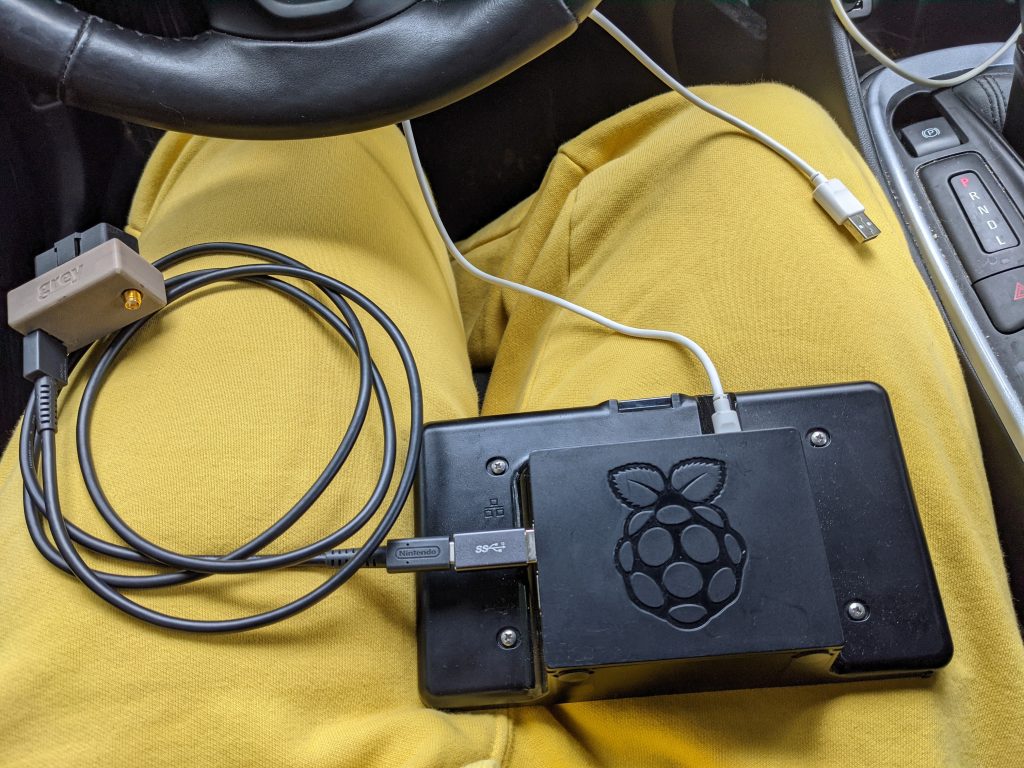

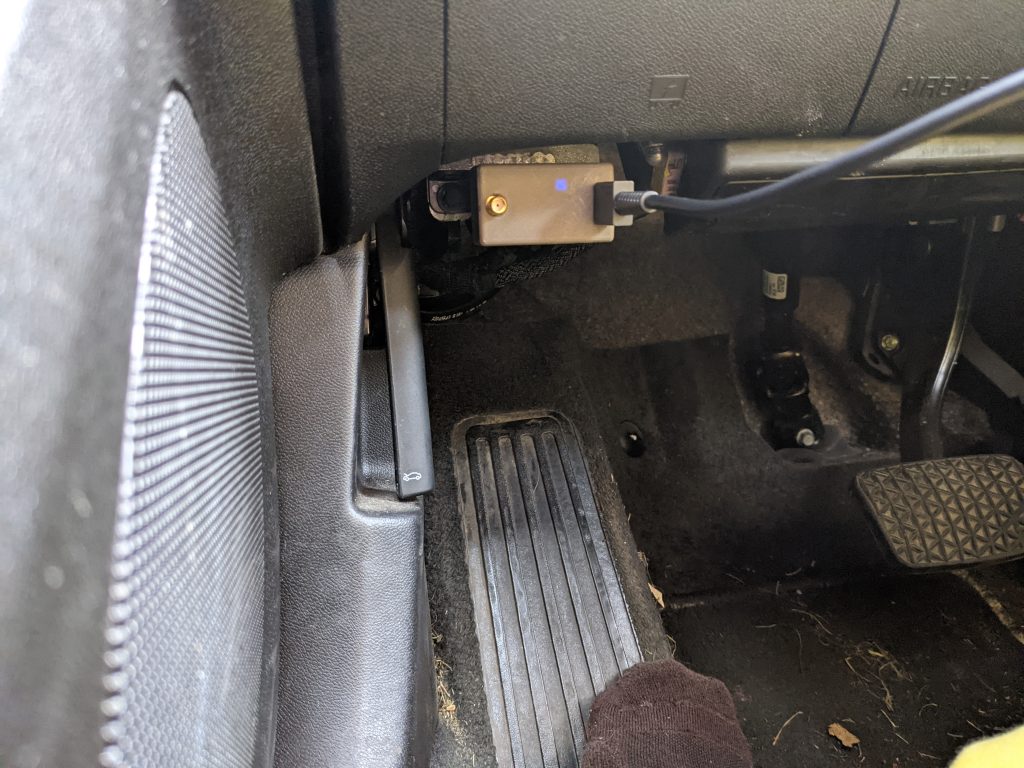
The image on the left shows the back of the Raspberry Pi screen case all loaded up with the Pi and everything. The Panda is just plugged into one of the Raspberry Pi USB ports and the white cable provides power. The white cable can be plugged into either USB port available in the center dash on the Volt. My Raspberry Pi complained about being underpowered sometimes but it didn’t seem to effect anything. The image on the right shows the Panda plugged into the OBD-II port to the left of the steering wheel down towards the floor. My cables were all long enough so I could rest the pi above the Volt’s built-in touch screen. I haven’t decided where or how I’m going to mount this thing yet. There is also probably a smaller screen you could get for the pi, or you could just wire up a single button. This was the hardware I had laying around so everything I chose was chosen to avoid having to buy anything new.
Interfacing with the Panda from a Raspberry Pi
It’s possible to interface with the Panda via USB from a computer as well, but since the Pi was going to need to talk to it eventually, I just used the Pi as the main interface. The Panda also appears to have Wi-Fi but I didn’t explore that at all. My workflow and coding setup was this:
- Pre-configure the Raspberry Pi to connect to my home Wi-Fi.
- Get in my car, turn it on, and plug everything in.
- SSH to the Pi from my laptop and do all the work from there, transferring files to and from the Pi via SCP as needed.
This is not the best, most comfortable, or most efficient setup, but I was happy with it and it never annoyed me so much that I felt compelled to make it easier.
Preparing the Raspberry Pi
The Panda requires Python 3.8 to build and flash the firmware, which we will need to do later, so let’s sort that out now. As of this writing, Python 3.8 is not the default Python on Raspbian. So you can either flash the Pi with Ubuntu (I didn’t try this) or you can follow the instructions here for getting Python 3.8 on the pi. Once done, type python --version at the prompt to ensure the default Python is Python 3.8. Also make sure pip --version says it’s using Python 3.8.
Reading data from the CAN bus
We’ll start by writing a simple Python script that will read data from the CAN bus and print it out as a messy jumble of unreadable nonsense (exactly like the example provided in the README for the Panda on GitHub).
First, we have to setup some udev rules so that, when the Panda is detected, the device mode is given permissions 0666 instead of the default 0660 (e.g. allow everyone read/write, not just the owner and group).
sudo tee /etc/udev/rules.d/11-panda.rules <<EOF
SUBSYSTEM=="usb", ATTRS{idVendor}=="bbaa", ATTRS{idProduct}=="ddcc", MODE="0666"
SUBSYSTEM=="usb", ATTRS{idVendor}=="bbaa", ATTRS{idProduct}=="ddee", MODE="0666"
EOF
sudo udevadm control --reload-rules && sudo udevadm trigger
It’s fine if the Panda was already connected, that’s what the udevadm trigger is for. If you’re curious, you can check dmesg when you plugin the Panda and you should see something like this:
[ 1645.769508] usb 1-1.3: new full-speed USB device number 5 using dwc_otg
[ 1645.906006] usb 1-1.3: not running at top speed; connect to a high speed hub
[ 1645.916768] usb 1-1.3: New USB device found, idVendor=bbaa, idProduct=ddcc, bcdDevice= 2.00
[ 1645.916796] usb 1-1.3: New USB device strings: Mfr=1, Product=2, SerialNumber=3
[ 1645.916812] usb 1-1.3: Product: panda
[ 1645.916826] usb 1-1.3: Manufacturer: comma.ai
[ 1645.916841] usb 1-1.3: SerialNumber: XXXXXXXXXXXXXXXXXXXXXXXX
You can also run lsusb to see the bus and device number given to the Panda (it will be the one with ID bbaa:ddcc or bbaa:ddee).
Bus 001 Device 005: ID bbaa:ddccThis tells us the device path for the Panda is /dev/bus/usb/001/005, and sure enough if I do an ls -l on /dev/bus/usb/001 I see device 005 has the rw permission for owner, group, and other, which is exactly what the udev rule above was supposed to do:
crw-rw-rw- 1 root root 189, 4 Nov 8 17:00 005With all of that unnecessary verification out of the way, we should now be able to interface with the Panda. So let’s first install the required Python dependency.
pip install pandacanThen, from within a Python shell, you should be able to run the following commands and get a wall of nonsense printed back after the can_recv step:
from panda import Panda
>>> panda = Panda()
>>> panda.can_recv()
Reading The Car’s Current Speed
In order to switch modes based on the car’s current speed, we will need to monitor how fast the car is going. To figure out which messages on the CAN bus contain the car’s speed and how to parse it out would require a lot of trial and error and reverse engineering. Thankfully, much of that has already been done. Comma AI’s Open Pilot is already a fairly mature system that can add auto-drive features to a surprising number of cars, so they’ve already figured a lot of this stuff out. There’s also plenty of resources from the car hacking community that break down several different message types for different cars. A lot of good reversing info on the Volt (and other cars) can be found here and here. However, the best resource I found, once I learned how to decipher it, was the opendbc repository from Comma AI.
Let’s see if we can find any information about how to parse the vehicle speed from the GM DBC files in opendbc. Looks like the file we want is gm_global_a_powertrain.dbc since it contains an ECMVehicleSpeed message definition with a VehicleSpeed signal definition in miles per hour. Sounds like exactly what we want:
BO_ 1001 ECMVehicleSpeed: 8 K20_ECM
 SG_ VehicleSpeed : 7|16@0+ (0.01,0) [0|0] "mph"  NEO
Now, these definitions are supposedly “human readable”, but that’s only true if you have a translator. This DBC_Specification.md on GitHub was extremely helpful with that. The first line that begins with BO_ is the message definition. The CAN ID is 1001 (0x3e9 hex), the total message length is 8 bytes and the sender is K20_ECM (I don’t know what that is besides an engine control module).
The line that begins with SG_ is the signal definition. This message has one signal, called VehicleSpeed, which starts at bit 7, is 16 bits long (2 bytes), big endian, unsigned, and a factor of 0.01 (meaning we’ll need to divide by 100), and is in units of miles per hour.
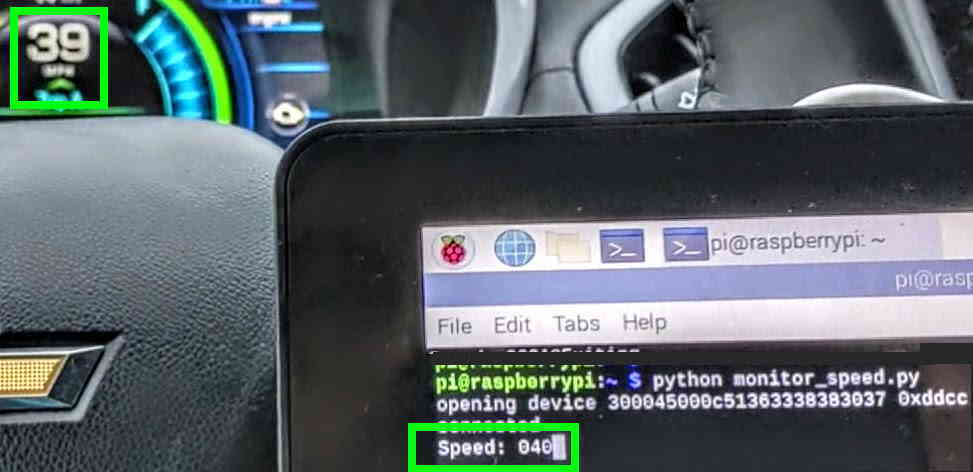
Let’s write a Python script to monitor the vehicle’s speed, print it to the terminal, and then go for a drive to test it out.
import sys
import struct

from panda import Panda

CURRENT_SPEED = 0.0


def read_vehicle_speed(p: Panda) -> None:
    """Read the CAN messages and parse out the vehicle speed."""
    global CURRENT_SPEED

    for addr, _, dat, _src in p.can_recv():
        if addr == 0x3e9:  # Speed is 1001 (0x3e9 hex)
            # '!' for big-endian. H for unsigned short (since it's 16 bits or 2 bytes)
            # divide by 100.0 b/c factor is 0.01
            CURRENT_SPEED = struct.unpack("!H", dat[:2])[0] / 100.0

        # Just keep updating the same line
        sys.stdout.write(f"\rSpeed: {int(CURRENT_SPEED):03d}")
        sys.stdout.flush()


def main() -> None:
    """Entry Point. Monitor Chevy volt speed."""
    try:
        p = Panda()
    except Exception as exc:
        print(f"Failed to connect to Panda! {exc}")
        return

    try:
        while True:
            read_vehicle_speed(p)
    except KeyboardInterrupt:
        print("Exiting...")
    finally:
        p.close()


if __name__ == "__main__":
    main()
That worked great! The vehicle’s speed is accurate to within 1 MPH of what’s displaying on the dashboard (which makes sense since the Pi is slow and the dashboard is also probably intentionally slow at updating).
Detecting Driving Mode Button Presses
Now that we’re monitoring the car’s speed, we can look into the mode button. To identify an unknown button using the Panda, there are some helpful scripts you can use: can_logger.py and can_unique.py. Instructions for how to use them to identify unknown button presses and other behavior can be found in the can_unique.md file. The basic procedure is this:
- Capture CAN bus traffic while not pressing the button and save that to a file
- Repeat step one but press the button a couple times
- Use
can_unique.pyto compare the files.
It’s important to log for long enough that you get rid of the bulk of the background noise. Thankfully though, looking at the DBC file from before, I found DriveModeButton which looks like what we need. The full message definition is below:
BO_ 481 ASCMSteeringButton: 7 K124_ASCM
 SG_ DistanceButton : 22|1@0+ (1,0) [0|0] ""  NEO
 SG_ LKAButton : 23|1@0+ (1,0) [0|0] ""  NEO
 SG_ ACCButtons : 46|3@0+ (1,0) [0|0] ""  NEO
 SG_ DriveModeButton : 39|1@0+ (1,0) [0|1] "" XXX
That’s a little confusing since the button is definitely not on the steering wheel, but it’s the right one. So parsing that out, the only signal we care about is the DriveModeButton which looks to be at bit offset 39, it’s one bit long, and is either a 1 or a 0. In Python we get the message data as a byte array, so bit 39 will be the 7th bit in the 4th byte of the message (I’m a programmer so all my numbers are indexed at 0). We can make a quick modification to monitor.py above and we’ll have it monitoring for engine mode button presses too:
CURRENT_SPEED = 0.0
BUTTON = 0
PRESS_COUNT = 0


def read_vehicle_speed(p: Panda) -> None:
    """Read the CAN messages and parse out the vehicle speed."""
    global CURRENT_SPEED
    global BUTTON
    global PRESS_COUNT

    for addr, _, dat, _src in p.can_recv():
        if addr == 0x3e9:  # Speed is 1001 (0x3e9 hex)
            # '!' for big-endian. H for unsigned short (since it's 16 bits or 2 bytes)
            # divide by 100.0 b/c factor is 0.01
            CURRENT_SPEED = struct.unpack("!H", dat[:2])[0] / 100.0
        elif addr == 0x1e1:  # ASCMSteeringButton
            # Check if the 7th bit of byte 4 is a 1
            if int(dat[4]) >> 7 & 1:
                BUTTON = 1
            elif BUTTON == 1:
                # Increment the press count on button release
                PRESS_COUNT += 1
                BUTTON = 0
            else:
                BUTTON = 0

        # Just keep updating the same line
        sys.stdout.write(f"\rSpeed: {int(CURRENT_SPEED):03d} Button: {BUTTON}")
        sys.stdout.flush()
Sending CAN Messages
Now that we can see when the mode button is pressed, we need to figure out how to actually send the button press ourselves. The first thing we need to do before we can get started is flash the Panda with a debug build of its firmware. In release, the panda won’t send anything, even if you tell it to, unless you enable one of the supported safety models. They have a safety model for each supported car, but those safety models only allow sending messages that they require for auto-driving and the engine mode button is not one of them. Once we flash it with a debug build, we’ll be able to use the SAFETY_ALLOUTPUT safety model (more like a danger model am I right?).
Flashing the Panda from a Raspberry Pi
To flash the Panda from my Raspberry Pi, the only thing I got hung up on was the Python 3.8 issue (noted above). Once you have Python 3.8, flashing the panda should be pretty easy:
- Clone the Panda GitHub repository
- Change into the
boardfolder and runget_sdk.sh - Once complete, run
scons -uto compile - Unplug the Panda from the OBD-II port on the car
- Power-cycle it by unplugging it from the Pi and plugging it back in (probably not required but for good measure).
- Once you see a slowly flashing blue light you can proceed with the final step
- Finally, with the Panda connected to the Pi but NOT connected to the OBD-II port, run
flash.sh
Once flashed, verify the version by running the following in a Python shell:
>>> from panda import Panda
>>> p = Panda()
opening device XXXXXXXXXXXXXXXXXXXXXXXX 0xddcc
connected
>>> p.get_version()
'DEV-4d57e48f-DEBUG'
>>> p.close()
The hex digits between DEV and DEBUG should match the beginning of the slug for the git commit you have checked out. We’re in DEBUG mode now, training wheels are off. Be careful and don’t drive yourself off a cliff. Once we sort out what we actually need to write out in order to change the driving modes, we can modify the Panda firmware to add a new safety model that only allows sending that driving mode button press.
Sending Driving Mode Button Presses
We have the DBC message definition for the drive mode button and we can see when it’s pressed. All we should have to do is enable the bus, set the safety model to allow everything, and blast out a message with a 1 in the correct place. According to the definition of ASCMSteeringButton above, the full message is 7 bytes. So we can start with 7 bytes of 0x00:
message = bytearray(b'\x00\x00\x00\x00\x00\x00\x00')Now we need a 1 in the 7th bit of the 4th byte. You can figure that out however you want. One easy way is to just type it into a programming calculator:
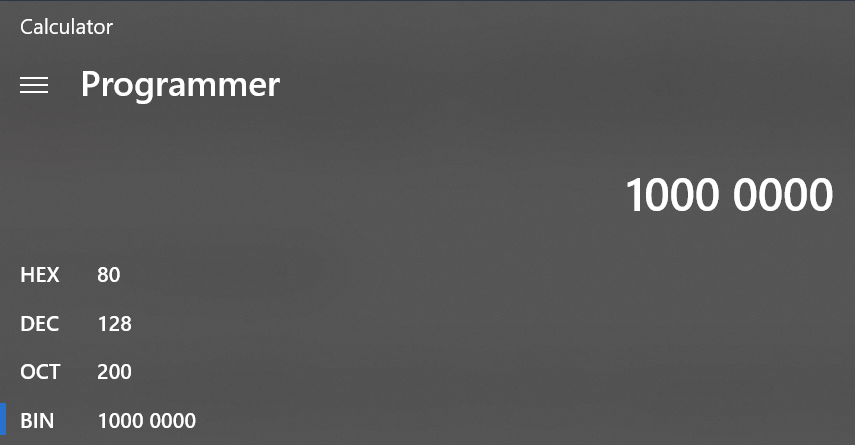
So that makes 128 in decimal or 0x80 in hex. So we can just put 0x80 in the 4th byte (indexed at 0) and that should do it:
message = bytearray(b'\x00\x00\x00\x00\x80\x00\x00')That’s our “drive mode button press” message. Now we have to:
- Set the safety mode:
p.set_safety_mode(Panda.SAFETY_ALLOUTPUT) - Enable output on CAN bus 0 which is the powertrain (ref):
p.set_can_enable(0, True) - Flush the Panda’s buffers for good measure:
p.can_clear(0xFFFF) - Call
p.can_sendwith the message ID (0x1e1),message, and a bus ID of 0 (for powertrain)
Putting it all together we have a prototype send.py to send the button press every second. We’ll use the press_count later to get us to the mode we want. For now, because of the while True we’ll just end up sending a button press every second.
import time

from panda import Panda


def send_button_press(p: Panda, press_count: int = 2) -> None:
    """Send the ASCMSteering DriveModeButton signal."""
    msg_id = 0x1e1  # 481 decimal
    bus_id = 0
    message = bytearray(b'\x00\x00\x00\x00\x80\x00\x00')  # 0x80 is a 1 in the 7th bit

    for press in range(press_count):
        p.can_send(msg_id, message, bus_id)
        print(f"Sent press {press + 1}")
        time.sleep(1)


def main() -> None:
    """Entry Point. Monitor Chevy volt speed."""
    try:
        p = Panda()
    except Exception as exc:
        print(f"Failed to connect to Panda! {exc}")
        return

    try:
        p.set_safety_mode(Panda.SAFETY_ALLOUTPUT)  # Turn off all safety preventing sends
        p.set_can_enable(0, True)  # Enable bus 0 for output
        p.can_clear(0xFFFF)  # Flush the panda CAN buffers
        while True:
            send_button_press(p)
    except KeyboardInterrupt:
        print("Exiting...")
    finally:
        p.close()


if __name__ == "__main__":
    main()
SUCCESS!!!
Implementing Trip Mode
All the hard parts are done, now we just have to create a script that will change the mode based on a set of rules. First it’s important to talk about the behavior of the mode button to make sense of why I wrote the code the way I did.
- The mode button press is not registered until it is released. You can hold it down as long as you want and nothing happens in the car until the button is no longer being pressed.
- When pressed, the mode selection screen comes up and you have about 3 seconds where repeated button presses change the selected mode. Wait longer than 3 seconds and you need 1 button press just to re-activate the mode selection process.
- When activated, the highlighted mode is always “normal” regardless of which mode the car is currently in (this is a good thing for us).
Since the highlighted mode is always “normal” after the initial button press, we don’t have to monitor for button presses by the user. If the user changes the mode on us, our code will still work, since the highlighted mode always starts with “normal”. This also means we only need 1 button press to switch back to normal mode at any time. In fact, if we store our modes in a list, the number of button presses needed to get to any mode will be its index plus 1.
Now, since button presses aren’t registered until release, it may seem like we need to follow each “press” signal with a “release” signal, but we actually don’t need to. Some other module in the car (not us) is still sending the ASCMSteeringButton message with the DriveModeButton signal set to 0 (when not pressed). When we blast out our message with DriveModeButton set to 1, we’re drowning out those 0’s in a way (I’m not an expert on CAN bus stuff). Once we stop sending that “1”, the module that’s supposed to send the message will continue sending “0”, since the button isn’t being pressed, and that will work as our button release.
Alright now we can dive into the code. First we have to create our Panda object and disable the safety and all that:
try:
    p = Panda()
    p.set_safety_mode(Panda.SAFETY_ALLOUTPUT)  # Turn off all safety preventing sends
    p.set_can_enable(0, True)  # Enable bus 0 for output
    p.can_clear(0xFFFF)  # Flush the panda CAN buffers
except Exception as exc:
    logging.error(f"Failed to connect to Panda! {exc}")
    return
Next, I created a CarState (not the best name) class to handle the rest. This class will take the Panda object and it will have an update method that we have to call in a forever loop. The update method will read CAN messages, set the speed, check if we need to change modes, and send button presses to switch modes if needed.
def update(self):
    """Update the state from CAN messages."""
    for addr, _, dat, _src in self.panda.can_recv():
        if addr == 0x3e9:  # Speed is 1001 (0x3e9 hex)
            # '!' for big-endian. H for unsigned short (since it's 16 bits or 2 bytes)
            # divide by 100.0 b/c factor is 0.01
            self._set_speed(struct.unpack("!H", dat[:2])[0] / 100.0)

        now = time.perf_counter()
        if self.pending_sends and now > self.allow_button_press_after:
            self.allow_button_press_after = now + self.BUTTON_PRESS_COOLDOWN
            send = self.pending_sends.pop(0)
            self.panda.can_send_many(send)
Similar to our monitor.py script, we loop over the messages and update the speed for the class. Then we check if there’s anything to send and if we’ve waited long enough before sending the next button press. If we send them too quickly they will be registered as if the button is being held down. You may also notice that we’re using can_send_many instead of can_send now. This is because, while driving, there’s a bunch more happening on the CAN bus than when sitting in my driveway. I noticed in testing that sometimes button presses were being missed when I was just sending a single message. So now I group 50 “press” messages and call can_send_many which blasts them out. This has the effect of making it look like the button is being held down for a moment before release (like a real human).
When the speed is set, we check if we’ve crossed the threshold and need to switch modes.
def _set_speed(self, speed):
    """Set the current speed and trigger mode changes."""
    speed = int(speed)
    if self.speed > self.speed_threshold and speed < 1:
        # HACK: Speed jumps to 0 b/w valid values.
        # This hack should handle it.
        return

    self.speed = speed
    if self.speed > self.speed_threshold and self.mode == "NORMAL":
        logging.debug(f"Speed trigger (attempt HOLD): {self.speed}")
        self._switch_modes("HOLD")
    elif self.speed <= self.speed_threshold and self.mode == "HOLD":
        logging.debug(f"Speed trigger (attempt NORMAL): {self.speed}")
        self._switch_modes("NORMAL")
There is a HACK in there that I don’t love but it works. If the previous speed is over the threshold (which will always be some high speed like 50 MPH or more), we check if the speed being set is less than 1 (and ignore if it is). This happens pretty constantly. It must be that the current speed from the ECMVehicleSpeed message isn’t always valid. I’m not sure how to tell when it’s valid or not, but the only way this hack will cause an issue is if you go from 50 MPH to 0 MPH in less than a fraction of a second. If that happens I don’t think we need to worry about switching the engine mode.
Finally, the _switch_modes method takes the requested mode, checks if we’re past the cooldown, and then updates our list of pending_sends with the button presses that need to be sent by the update method.
def _switch_modes(self, new_mode: str) -> None:
    """Send the messages needed to switch modes if past our cooldown."""
    now = time.perf_counter()
    if now <= self.allow_mode_switch_after:
        return

    logging.info(f"Switch to {new_mode} mode. Speed: {self.speed}")

    # Update our cooldown and mode
    self.allow_mode_switch_after = now + self.MODE_SWITCH_COOLDOWN
    self.mode = new_mode

    # Required presses starts at 1 (to activate the screen) and
    # mode selection always starts on NORMAL.
    required_presses = 1 + self.DRIVE_MODES.index(new_mode)
    logging.debug(f"Needs {required_presses} presses")
    for _ in range(required_presses):
        cluster = []
        for _inner in range(self.SEND_CLUSTER_SIZE):
            cluster.append([self.MSG_ID, None, self.PRESS_MSG, 0])
        self.pending_sends.append(cluster)
If we already switched modes recently, this method just returns. Since it doesn’t update the current mode, the _set_speed method will trigger it over and over until the mode switches or the car begins traveling a valid speed for the mode it’s already in. When the mode does switch, we compute the number of presses by the list index of the mode plus 1 (as discussed earlier) and then we update pending_sends. The clusters are groups of 50 “press” messages that are sent all at once with can_send_many so that we make sure our button press is long enough to be registered by the car.
That covers all the logic of the CarState class, the rest is just initialization. The full tripmode.py file can be found here: https://github.com/vix597/chevy-volt-trip-mode
Wrap it Up!
This blog post is probably too long but we’re almost done. What’s left?
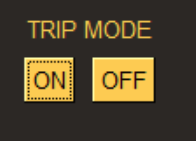
- Create a GUI with an “on” and “off” button
- Install it on the pi and have it start automatically at boot
For the GUI I’m going to try PySimpleGUI which seems to be exactly what I need. The “simple” in PySimpleGUI is no joke either, I’ve barely added any code and I have a working GUI.
def main() -> None:
    """Entry Point. Monitor Chevy volt speed."""
    trip_mode_enabled = False
    car_state = None

    # Theme and layout for the window
    sg.theme('DarkAmber')
    layout = [
        [sg.Text('TRIP MODE')],
        [sg.Button('ON'), sg.Button('OFF')]
    ]

    # Create the Window (800x480 is Raspberry Pi touchscreen resolution)
    window = sg.Window(
        'Trip Mode', layout, finalize=True,
        keep_on_top=True, no_titlebar=True,
        location=(0, 0), size=(800, 480))
    window.maximize()  # Make it fullscreen

    # Event Loop to process "events" and get the "values" of the inputs
    while True:
        event, _values = window.read(timeout=0)  # Return immediately
        if event == sg.WIN_CLOSED:
            if car_state:
                car_state.close()
            break

        if event == "ON" and not trip_mode_enabled:
            trip_mode_enabled = True
            car_state = enable()
        elif event == "OFF" and trip_mode_enabled:
            trip_mode_enabled = False
            car_state.close()
            car_state = None

        if car_state:
            car_state.update()

    window.close()
I broke out the code for creating the Panda connection and CarState object into an enable method which returns the CarState. Then I added a method to CarState to close the Panda connection and that was it. The PySimpleGUI code is copy-pasted from the main example on their home page with the text input box removed and the title and button text changed.
I’m going to save “start at boot” along with other improvements for later. I think this blog post is plenty long and covers everything I wanted. Check out the finished project over on GitHub and try it out for yourself if you also have a Chevy Volt. Or don’t. #GreatJob
References
- https://vehicle-reverse-engineering.fandom.com/wiki/GM_Volt
- https://github.com/openvehicles/Open-Vehicle-Monitoring-System/blob/master/vehicle/Car%20Module/VoltAmpera/voltampera_canbusnotes.txt
- https://itheo.tech/install-python-3-8-on-a-raspberry-pi/
- https://github.com/commaai/panda
- https://github.com/commaai/openpilot
- https://github.com/openvehicles/Open-Vehicle-Monitoring-System/blob/master/vehicle/Car%20Module/VoltAmpera/voltampera_canbusnotes.txt
- https://pysimplegui.readthedocs.io/en/latest/
About Me

Sean LaPlante
Software Engineer
Hello
Follow Me
Connect with me if you want.